Chapter 4. Setup QEMU VM as a Linux sandbox
Why bother?
One key insight I’ve gained through the process of implementing the scull device driver is the fragility of Linux kernel memory in the face of device driver malfunctions. Inappropriate memory access by device driver code can lead to unpredictable kernel behavior. When the kernel becomes unresponsive, rebooting the entire machine is not just inconvenient; it significantly slows down the development cycle.
While User Mode Linux (UML) is suggested in the literature, I’ve found that QEMU is a more popular and developer-friendly option for setting up a sandbox environment for Linux development. With a proper QEMU setup, the development environment is both safer and more efficient, as shown below.
Create QEMU VM
Install necessary packages
FYI, following setup assumes ubuntu / debian environment.
First, install packages related to QEMU and Samba (for a shared filesystem between the host and guest).
sudo apt install qemu-system qemu-user-static samba smbclient sshCreate disk image for VM
The next step is to create the disk image for our VM, which is quite straightforward, as shown below.
# qemu-img create -f {format of your disk image} {name of my disk image file} {size of disk image}
qemu-img create my-qemu-img 15G
There are many formats of disk images can be created through qemu-img, characteristics of each format can be found in qemu disk image documentation. The default image format, qcow2, offers a good balance between performance and features, such as encryption and snapshots.
Prepare Linux distro
For my QEMU VM, I opted for Ubuntu Server, which can be downloaded from the Ubuntu website. I chose Ubuntu Server because the standard Ubuntu desktop version is too resource-intensive for a VM, and while Arch Linux offers great flexibility, its installation process can be daunting. Ubuntu Server strikes a perfect balance: it’s lightweight and user-friendly, making it an ideal choice for beginners.
Set VM up
With the disk image and distribution ready, you can proceed to set up the QEMU VM.
qemu-system-x86_64 -enable-kvm -cdrom /path/to/downloaded/ubuntu-22.04.4-live-server-amd64.iso -boot order=c -drive file=file=my-qemu-img,format=qcow2 -m 4G- by specifying
-enable-kvm, the host can leverage the kvm module to enhance the performance of virtualization. -cdrom /path/to/downloaded/ubuntu-22.04.4-live-server-amd64.isomounts the Ubuntu Server ISO as a virtual CD-ROM, simulating a bootable USB drive.-boot order=cconfigures the VM to prioritize booting from the virtual CD-ROM.-m 4Gsets the VM’s memory allocation to 4 GB.
SSH into VM
While not strictly necessary, continuously toggling between the terminal and the QEMU graphical interface can be cumbersome. To streamline the workflow, it’s advantageous to SSH into the guest VM from the host. The simplest method for SSH access is through port forwarding, with further details available in qemu Networking.
# boot up the guest, configuring the port forwarding between host tcp port 12345 and guest port 22
qemu-system-x86_64 -nic user,hostfwd=tcp::12345-:22 -enable-kvm -m 4G -smp cores=4,cpus=4 file=my-qemu-img,format=qcow2

# ssh into guest from host through port 12345
ssh {your-id}@localhost -p 12345
The
-device e1000,netdev=net0option is essential for virtualizing the network device. However, it is configured by default for x86 QEMU VMs, so it’s not specified in the command above.
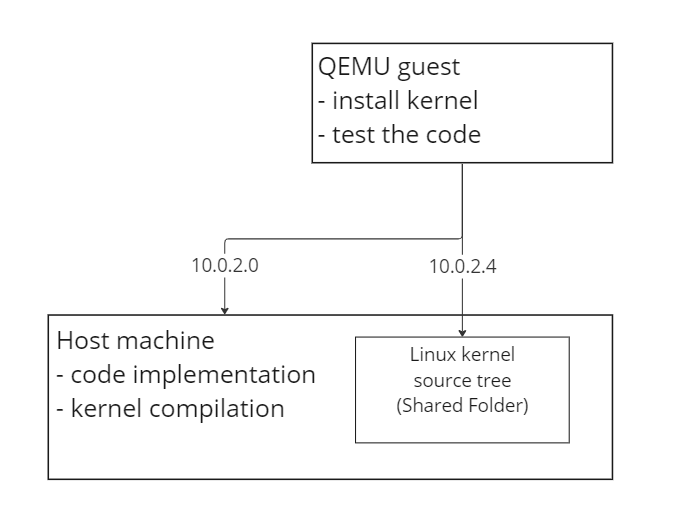
Share folder between host and guest
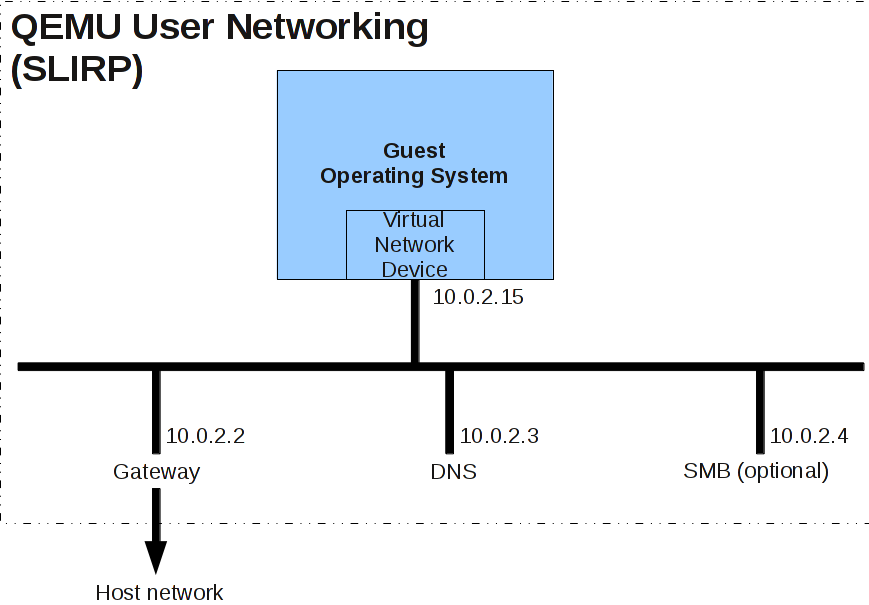
An efficient development cycle involves compiling the kernel on a powerful host machine and then installing or running it in the guest. Debugging through gdb may also be required. Sharing the Linux kernel source tree between the host and guest eliminates the overhead of file transfers. The default user mode network stack, which is used unless otherwise configured, supports the SMB protocol. From the guest’s perspective, this service is accessible at the IP address 10.0.2.4.
Refer to Invocation Documentation for further information.
Prerequisites
Ensure the necessary tools are installed on both the host and the guest before proceeding.
# install in both host and guest
sudo apt install samba cifs-utils
When starting the VM from the host, specify the directory to be shared using the SMB protocol.
qemu-system-x86_64 -nic user,hostfwd=tcp::12345-:22,smb=/path/to/your/host/folder/ -enable-kvm -m 4G -smp cores=4,cpus=4 file=my-qemu-img,format=qcow2Mount shared folder in guest
To complete the shared folder setup, perform a one-time configuration in the guest VM. This involves automating the mount of the shared folder at boot time. Edit the ‘/etc/fstab’ file in the guest and append the following entry:
# /etc/fstab
//10.0.2.4/qemu /path/to/guest/mount/point cifs uid=1000,noperm 0 0
The
uidvalue can be determined by executingid $(whoami)in the terminal. While setting up SMB credentials is advisable for security reasons, this step is simplified by omitting it here.
Once the automatic mount is configured as described, the guest VM will seamlessly access the shared folder after a reboot, streamlining your development workflow. Let’s dive back into device driver development. Happy coding!
Conclusion
Hope this guide equipped you with a robust environment for Linux development by leveraging QEMU VMs. By isolating the development activities in a virtualized environment, you reduce risks to your host system and enhance productivity. Then entire environment ensures that you can focus on what truly matters: building and debugging with confidence.